algorithmic modeling for Rhino
Triangulate image pattern
Hi everyone,
So I am new in grasshopper and I am trying to figure out some triangulation pattern for a perforated facade.
I followed some tutorials and I understood well how to create a perforated surface with a image sampler or with attractor points.
Some example :
but I don't figure out how to create a perforated surface based with the triangulate grid and an image sampler.
exactly like this :
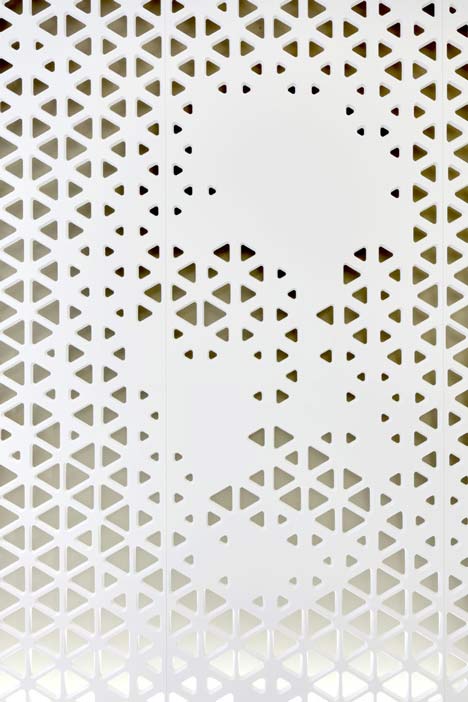 Link : Open Lounge by NAU + DGJ
Thanks for your helps in advance!
Alexandre
Views: 8565
Replies to This Discussion
-
Permalink Reply by Daniel González Abalde on
-
This definition is more generic, allows you to use any tessellation and use some pixel channel (int this case brightness) to form the pattern. It ends using meshes to make it faster and can be applied smoothing as in the sample. You need MeshEdit add-on for clean the joined mesh and WeaverBird for subdivision.
As a generic note* Please, if you are part of a professional study, consider hiring freelance as a way to encourage and sustain the community to which you ask for help. We can all go further than we are able to see when we risk betting on linking the right people. :) - Attachments:
-
-
 PanelImagePattern.gh, 1.3 MB
-
-
-
Permalink Reply by Joseph Oster on
-
This is a quickie. Fine tuning of parameters is required to get a great result; details like ignoring holes below a certain size... 'Image Sampler' will likely be lost due to long-standing bug in GH.
- Attachments:
-
-
image_sampler_2017_Oct05a.gh, 1.2 MB
-
-
-
Permalink Reply by Alexandre on
-
Thanks to both for quick answer, I have now 2 options to create it.
I had a fillet option node to your options and it give me the result that I was looking for.
One more question, What would be the best way to apply this parameters to different facades. I have different surfaces shapes. I don't want them to deform the image, I want the image to be trim/crop and remove holes from the perimeter (a border).
This is the project:
If the image could be divided between all sections above, that would be great! Otherwise, I will need to create multiple images sampler.
Thanks again!
Alexandre
-
-
Permalink Reply by Kim hauer on
-
Lets hope you don't use the Einstein image, people will tire of looking at the same damn image every day.
Also whatever image you do end up using, you will have to get rid of gray scales in the image, since they will interfere with the final 3d cutter cut.
More importantly do you really think some thin aluminum or steel membrane will not buckle or bend shortly or doing installation?
-
-
-
Post code please? And a target geometry for the mapping? There are several ways to transpose the pattern to multiple surfaces...
-
-
-
Here to code and geometry.
Thanks in advance!
- Attachments:
-
-
Image Sampler perforation.3dm, 286 KB
-
image_sampler_Perforation.gh, 428 KB
-
-
-
-
I started to play with 'Map Srf' with the idea of using 'Project' from two sides of a bounding box... but see a problem already with image continuity around the corner, and there is so much more to do...
- Attachments:
-
-
image_sampler_2017_Oct05b.gh, 33 KB
-
-
-
-
First, thanks you for your hard work, I really appreciate it!
Yeah it seems that the corner is a problem, but if I am not wrong, the image is flipped and that is why there is no continuity. I mean, in the corner there is the 2 extremities of the image instead of the line section that you created. Maybe there is a simple way to flip them back.
If this is too complicated, I can try to simplify the image and create a seamless image where the left and the right border will be the same. Or maybe, an image sampler perforated surface isn't the best way to do this. Maybe with a attraction curve will be more flexible to adjust the corner.
Another solution will be to concentrate the work on the most important part of the facade and work on the others sections independently. Unfortunately, the most important section is the corner of the project.
They are only speculation, because in fact, all this is above my knowledge of the software. I didn't think it will be so complicated.
Thanks again!
Alexandre
-
-
-
I created this new pattern with attractions curves that would be more easy to expand, adjust and fit with the geometry. we can easily manipulate, eliminate or aggregate curves. For now, the holes have a polygon shape (I didn't find the way to get a similar result as the triangulate grid).
In this code, I also added a border to remove edge points.
- Attachments:
-
-
Perforated_multi_attractor.3dm, 61 KB
-
Perforated_multi_attractor.gh, 18 KB
-
-
About
Welcome to
Grasshopper
Translate
Search
Photos
Videos
© 2026 Created by Scott Davidson.
Powered by
![]()