algorithmic modeling for Rhino
Cordyceps
So I've been working on a more haptic way of designing, as I felt a necessity to be in more dynamic control of my final designs. Surprisingly, I felt like communicating with my design when I created the Cordyceps. Maybe some of you find this helpful/useful.
So basically, the Cordyceps is a physical module with 4 knobs and 1 slider. The knobs give an output between 1 and 1000, while the physical slider outputs 0-359. And of course, for this physical module I wrote a plugin to communicate with it. The knobs are intended to be the variables that modifies the design, while the physical slider is intended to be connected to the camera component.
Here I will put up "the recipe" for all to make their own module. You will be able to download the plugin as well.
Please send me a message if you want the 3D-files for the knobs, the box and slider knob. They've been made to directly 3D-print.
Plugin:
https://github.com/zakadjeb/Cordyceps/blob/master/Cordyceps/Cordyce...
Code for Arduino IDE:
https://github.com/zakadjeb/Cordyceps/blob/master/Arduino/_Arduino_...
What you need:
1x - Arduino (Leonardo, UNO or whatever)
4x - Potentiometers
1x - Sliding potentiometer
1x - Breadboard
Bundle of jump wires.
1. So, a potentiometer is a variable resistor, which is basically a component that changes the resistance between the voltage and the ground.
If A is supplied with 5V then B must be connected to Ground. The W will give "read" the resistance, and thus should be placed in Analog input (A0-A5) on the Arduino. The slider potentiometer works the same way.
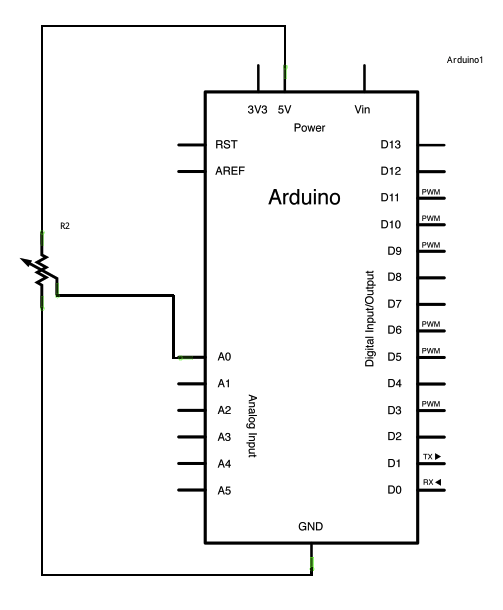
2. Now connect the 4 pots to each their Analog input. The slider is supposed to be in A4. So to make sure:
A0: Knob1
A1: Knob2
A2: Knob3
A3: Knob4
A4: Slider
3. Now it's time to connect the voltage! Using the breadboard, the voltage can be sent through 1 line, the Ground as well. It should be quite easy to connect them.
4. Now, download the Arduino IDE and copy-paste the code I supplied above. In the IDE, you need to let it know which Arduino you're working with, and which port is should send the script.
5. Almost there. Download the plugin. Open the port you're using through the plugin. Set Start to True and the Cordyceps should be within you.
This recipe will be updated!
Let me know if there are any issues.
// Zakaria Djebbara
Views: 187
About
Welcome to
Grasshopper
Translate
Search
Photos
Videos
© 2026 Created by Scott Davidson.
Powered by
![]()